-- Scotts Contracting - StLouis Renewable Energy: CAD Detail

Search This Blog

Showing posts with label CAD Detail. Show all posts

11.22.2020

Arched Window Shade CAD Design Sketches


I love the Arched window and the light it lets into and fills the room. But sometimes I would like to be able to block and filter the light. The Off the Shelf stuff for window treatments I didn’t feel are affordable and a good fit for what the vision I have for the window and how it fits in with the other decor. 

The design of the Window Treatment sold at Lowes I don't feel fits the decor and style of the Home Office Space I am creating.

The desired look I created in this space is a combination of Modern and Old World Style that eliminates the expensive molding and framing used to enclose or picture frame the window. I chose the sleek "no frame" inexpensive sheetrock only frame that blends in with the walls without destracting from the focal point of the room - Fireplace and Mantle.

Here are a my sketches of how I am going to DIY a window covering.  Scotty Nov 2020

Arched Window Shade CAD design sketches by Scotty -
I love the Arched window and the light it lets into and fills the room. But sometimes I would like to be able to block and filter the light. The Off the Shelf stuff for window treatments I didn’t feel are affordable and a good fit for what the vision I have for the window and how it fits in with the other decor.  Here are a my sketches of how I am going to DIY a window covering.  Scotty Nov 2020

While pondering the materials to use for the shade I am realizing how easy the oriental style fan design would filter the light, that train of thought inspired the idea that two or more filter systems could be created in varying degrees of filtration.

Stay Tuned as I figure out how to put it all together and work out the small stuff. I'll be posting more info in the near future on the Covid Home Office Makeover.

The upgraded and upcycled Antique Fireplace Mantle is also nearing completion! I should have it all put together soon.


Thank You for stopping by the Green Blog. If additional information is needed or you have a question let me know by posting a question or comment. Together we can make a difference and create a future that will benefit everyone.


4.11.2019

TPO Roof - NO Touch Electric Ground Wire Installation

TPO Roof - NO Touch Electric Ground Wire Installation

A prototype CAD design has been created with SketchUp and uploaded as a Free Share / Open Source Design in the 3D warehouse


TPO Roof - NO Touch Electric Ground Wire Installation

GAF TPO EverGuard 'strips" were fashioned around the Ground Wire attached to the rooftop communication equipment (Cable, Satellite, and Internet Antennas).  To keep the wire from rubbing holes in the roofing when the wind blows or from rain storms.  TPO strips (1in by 5in) were modified and welded to the existing TPO Roof surface to hold the Ground Wire 1 inch off the roof.  The modified NO Touch Electric Ground Wire attachments were placed 12 to 16 inches apart.


Thank You for stopping by the Green Blog. If additional information in needed or you have a question let me know by posting a question or comment. Together we can make a difference and create a future that will benefit everyone.

11.06.2013

Ensuring Success StLouis Small Biz Energy Efficiency Design Build Project

In todays day and age of small business enterprises I rarely find that a local St Louis area small business is actually thriving.  And when I learned that this successful small business needs to expand to meet the needs of her growing business I was more than happy to assist her in making her business a continued success by utilizing proven advanced energy efficient construction techniques for this Attic Conversion.

"Proper Design Build Energy Conservation Techniques used in this project will ensure that this business owner will keep the energy costs low and comfort levels high-Scotty,Scotts Contracting"

Here is behind the scene work on the Design Build Energy Efficiency-Attic Conversion and the Small Business Customer Must Haves for the project and how I am going to convert the unused attic space into a functional and energy efficient design build project that meets and exceeds the clients requests


Here are the clients Must Haves:
  • Energy Efficient Design (part1)
  • Open Floor Plan (part 2)
  • Kid Sized Plumbing Fixtures located in the Bathroom (part 3)
  • 1 Sink located outside the Bathroom with Extra Counter-space (part 3)
  • Flooring options require materials that do not transfer sound and are easy clean up (part 4)
  • No Harmful VOC Building Products (part 4)
  • Cost Effective (part 4)
  • Financing this Small Business Success Story Design Build Project (part 5)

Designing for Energy Efficiency
Since this project will be in the top floor of a two story building special attention was given to ensure that proper levels of insulation are utilized as well as eliminating air leakage.  


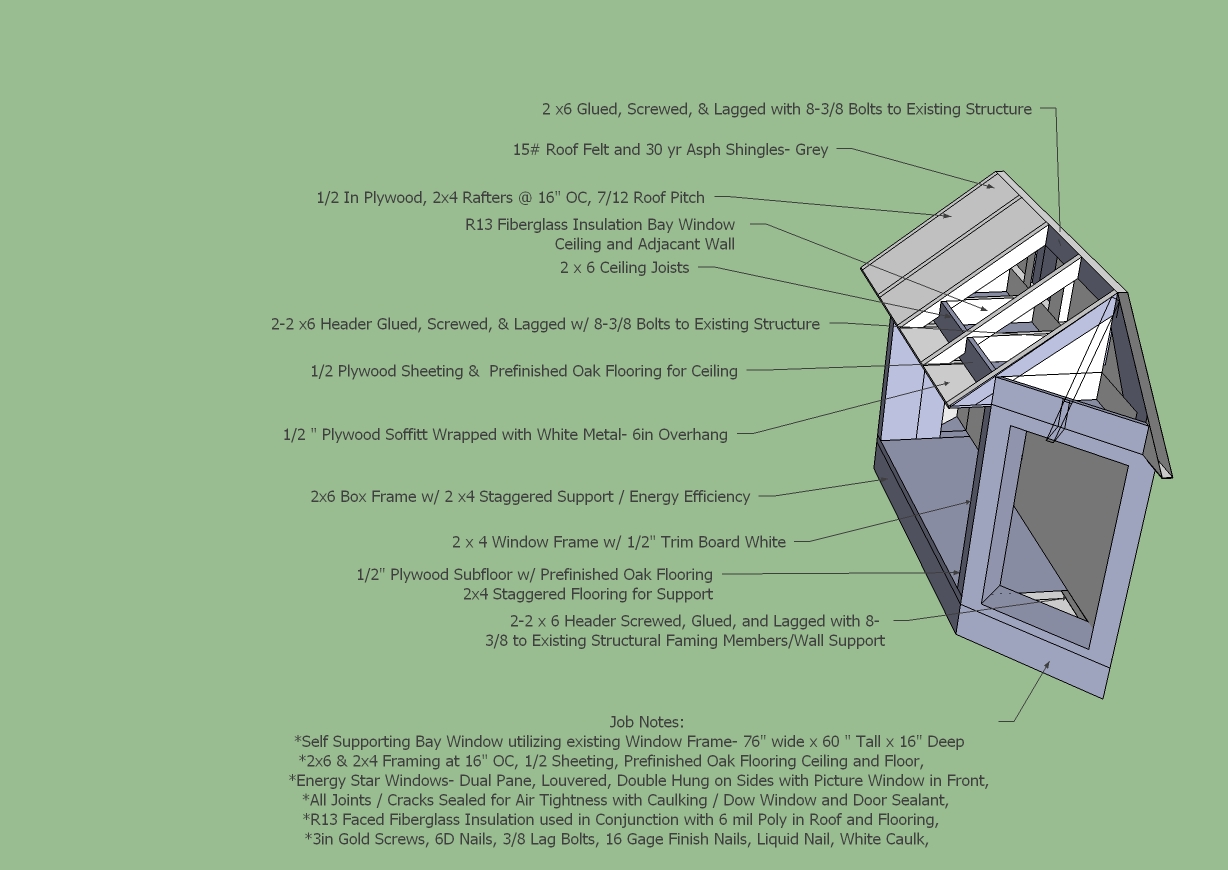
Here is a CAD drawing of the planned Ceiling and modifying the existing Roof Construction that addresses building code requirements for energy efficient design and construction.

Three Main Aspects: Natural Air Flow, R49 Ceiling Insulation, and Air Tight Electrical Junction Box Covers
Three Main Aspects of proper ceiling construction for energy efficiency: (1)Natural Air Flow, (2) R49 Ceiling Insulation, and (3) AirTight Electrical Junction Box Covers

CAD Detail cutaway view of the above Energy Efficient design calling out not only the proper ceiling construction with insulation and air barrier added to the Attic Knee Walls and Dead Space
CAD Detail-Energy Efficient Ceiling and Wall Construction by Scotty-Scotts Contracting
In the above photos you see that Natural Air Flow is mentioned numerous times.  The importance of natural air flow-is not only suggested it is required by the new building codes that are slowly being adopted and utilized in today's energy efficient building designs.

What gets me is that why some builders leave out this crucial step.  Its not a new concept and one that I learned in my first year of Drafting classes in 1989 while designing my final year Residential Home Drafting Project.  

What this natural air flow does is keep the upstairs cooler in the summer and is needed to assist in eliminating ice dams during the winter.

Rule of Thumb for determining this natural air flow from eve to roof peak is: 1 square inch for every square foot of space.  

This 1 square inch is then divided equally in half between the top and bottom of the building.  In the case of this building we will be using: Soffit Vent as well as Roof Peak Vent and to ensure there is unobstructed air travel Air Baffles will be utilized in the areas where the insulation contacts the underside of the roof.

Never let a Building Contractor neglect this important step in any of your building projects.

Stay Tuned for Part 2 of the Design process where I address the open floor plan.


Thank you for stopping by St Louis Renewable Energy. Feel free to comment in the section below or contact Scotts Contracting- St Louis Home Improvement Projects and Energy Reducing Needs Get Your Green Building Tips and Resources at St Louis Renewable Energy Green Blog

11.02.2013

#DesignBuild Energy Efficiency-Attic Conversion

My next Design Build Project will be converting this unused attic into Energy Efficient and usable 2nd Floor Space.   

We will be performing major Energy Conservation Build Techniques as well as using Advanced FramingMethods on this Green Build Project 

Upon completing we will have the following RValues: R19+ in the wall, R49 Attic, R13+ in the Floor. 

My plans also call for Air Tight Electrical Junction Box Covers in the Attic as well as 6mil Poly Air Barrier for the Interior Walls. 

Stay Tuned for more project photos as well as otherCAD Drafting details by Scotty-Scotts Contracting . 

Build Green Scotty! 


#DesignBuild   #EnergyConservation  #AdvancedFramingTechniques   #RValue  #CADDrafting 

CAD DesignBuild Attic Conversion Project Drawings and Before Pics
See more of the CAD Drawings for this Energy Efficient Attic Conversion at the link below


Thank you for stopping by St Louis Renewable Energy. Feel free to comment in the section below or contact Scotts Contracting- St Louis Home Improvement Projects and Energy Reducing Needs Get Your Green Building Tips and Resources at St Louis Renewable Energy Green Blog

11.05.2012

Benton Project CAD Drawings


On Mon, Nov 5, 2012, Scotty-Scotts Contracting, St Louis Renewable Energy scottscontracting@gmail.com wrote:

CADD Courtesy-Scotty,Scotts Contracting-St Louis Renewable Energy


Eighty Percent of the Time Construction Projects seem to run more efficiently, finish on-time, and stay within budgets when a set of Design Plans are available for the project.


Old Western - Old South St Louis Architecture Decor and Feel for a Modern Day Apartment- Benton Gut Rehab

Typical Wall Framing Detail-Benton Project, courtesy of Scotty, Scotts Contracting
Floor Plan #1256 Benton Project, courtesy of Scotty, Scotts Contracting


Twitter                                                         Facebook

sponsored by:

4.03.2012

Cofferred Ceiling-Can Lights- CAD Drawings

Simple CAD Designs by Scotty, Scotts Contracting for Kitchen Remodel Project
Coffered Ceiling & LED Lighting Layout-CADD Designs by Scotts Contracting
4 in Recessed Can Lighting Layout and Coffered Ceiling Design

Coffered Ceiling-CADD Designs by Scotts Contracting
CADD Design by Scotty, Scotts Contracting-St Louis Renewable Energy


Thank you for stopping by St Louis Renewable Energy. Feel free to comment in the section below or contact Scotty for any Home Improvement Projects or Energy Reducing Needs and Scotty, Scotts Contracting will respond ASAP. Company Web Address: http://www.stlouisrenewableenergy.com

2.23.2012

Green Deck Repair Photos

Saving a Deck from the Landfill by bringing existing deck up to current building codes.  See the CAD Drawings needed for the St Louis Building Permit office to follow.  Action Photos of the Deck Rebuild will post soon.


Action Photos will be posting Daily until Project is completed.  Scotty


Thank you for stopping by St Louis Renewable Energy. Feel free to comment in the section below or contact Scotty for any Home Improvement Projects or Energy Reducing Needs and Scotty, Scotts Contracting will respond ASAP.

2.14.2012

How to Fix a 2nd Floor Porch/Deck Railing

Thank you for stopping by St Louis Renewable Energy. Feel free to comment in the section below or contact Scotty for any Home Improvement Projects or Energy Reducing Needs and Scotty, Scotts Contracting will respond ASAP.


In the following CAD Diagram you will see how to straighten a Deck Railing Before Anchoring Deck Posts to Building.  Deck Posts Anchored to Masonry Wall w/ 3/8"x3 1/2" Lag Bolts & Anchor @ 8" OC

How to Straighten a Deck-Porch Rail before Anchoring Post to
Wall, Simple CAD Drawing by Scotty, Scott's Contracting, St Louis Renewable Energy
http://www.stlouisrenewableenergy.com


Scotty Adding 2x4 Support for 2nd Floor Porch-Deck Rail
http://www.stlouisrenewableenergy.com

Click Here for More Action Photos of Scotts Contracting

Adding Deck Support


11.02.2011

CSP Design with Heat Recovery Unit-Designed by Scotts Contracting

UPDATE:  Concentrated Solar Power Design with Added Heat Recovery Unit-

  • CSP-CAD Diagram designed by Scotty, Scotts Contracting-St Louis Renewable Energy Nov 1, 2011


Updated Concentrated Solar Power Photovoltaic Design with Added
Automatic Heat Recovery Unit for Dual Energy Savings
This is an update on the CSP (Concentrated Solar Power) design with Heat Recovery Unit for added energy savings.

Design Features:

  • Parabolic Trough Focuses the Suns Rays onto the Receiver
  • Photovoltaic Receiver creates Electricity and 
  • Energy via the Automatic Heat Recovery Unit
Notes
  • Many of the CSP designs on the Market today "create steam to generate electricity".  This design will create electricity efficiently via Photo-voltaic Cells in the receiver; thus eliminating the need for Steam Engines.  It also generates heat to be used in the Heat Recovery Unit (twice as much usable energy for today's home and business).
  • Heat Recovery Unit incorporates a automatic air handler set by thermostat for transferring climatically controlled air movement.
  • This design works exceptionally well during the winter time when the suns radiation is at it lowest radiation level-the loss of energy is minimized by the Heat Recovery Unit.   
  • Concentrated Solar Power will soon be available for non-desert regions and easily adaptable for any region. 
  • System allows for the'Receiver' to easily upgrade to new and developing Photovoltaic Cells for increased electrical output

Seeking Assistance to further Develop this CSP Design2.  Please use the Contact Form> for additional info and Scotty, Scotts Contracting will reply ASAP.

10.26.2011

CAD Drawing-Insulation -St Louis Brick Home-Examples

How insulation Saves Money- How Insulation Works-Typical-St Louis Brick Home used in Examples
How Insulation Works

Top View: Brick Home with Zero Insulation

Brick Home Wall Detail with Zero Insulation


Brick Home with Insulation in Wall Cavity


Why Insulate Your House?

Heating and cooling account for 50 to 70% of the energy used in the average American home. Inadequate insulation and air leakage are leading causes of energy waste in most homes. Insulation:
  • saves money and our nation's limited energy resources
  • makes your house more comfortable by helping to maintain a uniform temperature throughout the house, and
  • makes walls, ceilings, and floors warmer in the winter and cooler in the summer.
The amount of energy you conserve will depend on several factors: your local climate; the size, shape, and construction of your house; the living habits of your family; the type and efficiency of the heating and cooling systems; and the fuel you use.

Once the energy savings have paid for the installation cost, energy conserved is money saved -saving energy will be even more important as utility rates go up.

This fact sheet will help you to understand how insulation works, what different types of insulation are available, and how much insulation makes sense for your climate. There are many other things you can do to conserve energy in your home as well. The Department of Energy offers many web sites(http://ornl.gov/sci/roofs+walls/insulation/ins_07.html) to help you save energy by sealing air leaks, selecting more energy-efficient appliances, etc.


How Insulation Works


How Insulation Works

  • Heat flows naturally from a warmer to a cooler space. In winter, the heat moves directly from all heated living spaces to the outdoors and to adjacent unheated attics, garages, and basements - wherever there is a difference in temperature. 
  • During the summer, heat moves from outdoors to the house interior. 
  • To maintain comfort, the heat lost in winter must be replaced by your heating system and the heat gained in summer must be removed by your air conditioner. Insulating ceilings, walls, and floors decreases the heating or cooling needed by providing an effective resistance to the flow of heat.


  • Reflective insulation or Radiant Barriers works by reducing the amount of energy that travels in the form of radiation. Some forms of reflective insulation also divide a space up into small regions to reduce air movement, or convection, but not to the same extent as batts, blankets, loose-fill, and foam.


Reference> http://ornl.gov/sci/roofs+walls/insulation/ins_01.html


Click here to: Schedule a Green Site Evaluation to Weatherize your Building against the High Heating Costs


9.07.2011

Final Bay Window Build Pictures

Energy Star Bay Window Build Photos by Scotts Contracting


Bay Window CAD and Build Notes
Floor Plan for Bay Window Permit


Before Photo of Home Before Bay Window

Bay Window CAD Detail
Before Bay Window Installation
Bay Window Framing


Final Bay Window Photo

After Bay Window Installation- Final Photo
Home was Originally Built using Square Nails- Found while removing the Existing Siding for Bay Window Installation
Interior View of Prefinished Oak Flooring 


Installing R13 Fiberglass Batt Insulation


Scotty, Scotts Contracting- Testing the Bay Window Floor for Strength
Final Photo- Another Job Well Done, On-Time, and On Budget
Bay Window Oak Flooring Photo

Build Photo


Connect with Scotts Contracting

FB FB Twitter LinkedIn Blog Blog Blog Blog Pinterest