-- Scotts Contracting - StLouis Renewable Energy: Deck Repair

Search This Blog

Showing posts with label Deck Repair. Show all posts

8.29.2015

Saving a Deck and Cash

I saved this homeowner six thousand dollars by removing the rotten wood and adding a little concrete to the Deck Piers.  
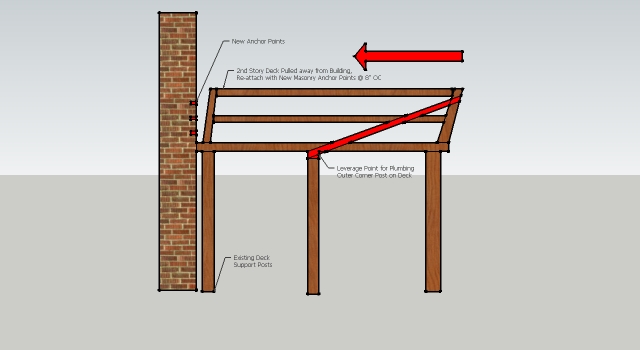
Image Bottom 4in Rotten 6by6 Cedar Deck Post

1) Problem


2) Solution


  • Cut the bottom 8 inches off the 6x6 cedar post
  • Wire Tie Number 4 Rebar (1/2 in x 8 in long) to existing Dowel Pin

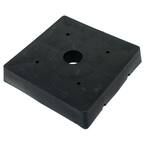
Simpson Strong-Tie Model # CPS6 Internet # 100375387 Store SKU # 825329

6 in. x 6 in. Composite Plastic Standoff

 6 in. x 6 in. Composite Plastic Standoff
  • Drill New Dowel Pin Hole for the Number 4 Rebar and Install this Composite Standoff to keep the Cedar Post from Rotting in the Future.

  • Install New Concrete 10x10 in Concrete Pier Base Cap

  • Water Proof and Protect new Concrete Pier with a layer of Concrete Portland/Sand topping mix.


The Client had 2 Bids as suggested:  

  • Rebuild Deck Bid 1............................$38,000
  • Replace Deck Posts Only Bid 2.........$8,000.  

I was the third bid and beat the lowest bid by $6,000.


Thank You for stopping by-Share and Comment below. If additional information in needed or you have a question let me know. Together we can make a difference and create a future that will benefit everyone. Build a Green StLouis Green Building Tips and Resources via: Scotty- St Louis Renewable Energy Green Blog

3.05.2012

Saving a Deck From the Landfill Part 3-


Day 4 Photos of the Structural Deck Repair- 
Installing the Handrails
Rebuilding the Lower Staircase
Simpson Strong Tie Connectors


 "Bring the Deck to Current Building Codes or Tear It Down


Part 4- Saving a Deck from the Landfill will post soon ( Power Washing and Paint Next Steps)


Day 4


  • Upper Staircase
  • Hand Rail
  • Bracing
  • Clean Up
Upper Staircase Completed

  • Simpson Strong Tie Connector for Post Beam Location
Simpson Strong Tie Connector Post Beam Location


  • Simpson Strong Tie Connector for Staircase Stringers
Strong Tie Stair Stringer Support Straps 20 ga


  • Lower Staircase
  • Hand Rails
  • Bracing
Completed Lower Staircase 


  1. All Structural Issues Passed Inspection Mar 5, 2012
  2. Power Washing and Paint Next Steps


Thank you for stopping by St Louis Renewable Energy. Feel free to comment in the section below or contact Scotty for any Home Improvement Projects or Energy Reducing Needs and Scotty, Scotts Contracting will respond ASAP. Company Web Address: http://www.stlouisrenewableenergy.com

3.03.2012

Saving a Deck From the Landfill Part 2- Rebuilding the Lower Staircase


Day 3 Photos of the Structural Deck Repair- 
Rebuilding the Lower Staircase


 "Bring the Deck to Current Building Codes or Tear It Down
Part 2- Day 3
  • Lower Stair Case
  • 1x8 Risers
  • 2x12 Treads

Rebuilding the Lower Staircase- 2x12 Treads with 1x8 Risers


  • Lower Stairs Top View
Lower Stairs Top View


  • Simpson Strong Tie Connector
Photo will post soon
  • Upper Stairs
  • 1x8 Risers
  • 2x12 Treads

Upper Stairs Side View 2x12 Treads with 1x8 Risers


Part 1- Saving a Deck from the Landfill 
Part 2-Saving a Deck from the Landfill
Part 3- Saving a Deck from the Landfill will post soon


Thank you for stopping by St Louis Renewable Energy Green Blog. Feel free to comment in the section below or contact Scotty at the new company website http://www.stlouisrenewableenergy.com for any Home Improvement Projects or Energy Reducing Needs and Scotty, Scotts Contracting will respond ASAP.

2.29.2012

Saving a Deck from the Landfill


Deck Repair by Scotty-Scotts Contracting, St Louis Renewable Energy

Because the Deck was not built to current Building Codes the St Louis Building Code Department required- 
"Bring the Deck to Current Building Codes or Tear it Down"
  1. Structural Site Inspection and Documentation of Needed Repairs of the Deck by an Architectural Engineer,
  2. Obtain a Repair Permit (based on the Engineers findings) for the needed repairs,
  3. Structurally reinforce the existing deck to the Suggestions made by the Architectural Engineer,
  4. Repair other areas that are in disrepair
  5. Have the added “Structural Work” Inspected by the St Louis Building Code Official
  6. Power Wash and Paint
  7. Final Inspection by the St Louis Building Code Official and Property Owner


Day 1 Work Photos
  • Add ½ in by 8in Lag Bolts at 16in OC at Joist House Connection to existing 3/8 in Lag Bolts
    Add ½ in by 8in Lag Bolts at 16in OC at Joist House Connection to existing 3/8 in Lag Bolts, Scotts Contracting, St Louis Renewable Energy 

    • Additional Photo of Added Lag Bolts to Joist Wall Connection

    Additional Photo of Added Lag Bolts to Joist Wall Connection


    • Lag Bolts at 16in OC the Entire Length of the Joist

    Lag Bolts at 16in OC the Entire Length of the Joist 


    • Temporary Support for Safety and to make sure the Deck Stays True and Plumb while we added the Double 2x8 Main Support Beam
    • Note: I don't really think the Deck would have collapsed onto the crew while working on the Main Support but for Peace of Mind I went ahead and installed a Temporary 2x4 Post and Beam.
    Temporary Support for Safety


    • Note: Simpson Strong Tie Connector- Post Beam Connection on 2 Center Posts
    • Outer Post utilize 2- 1/2 x 8in Bolt, Nut, Washer

    Simpson Strong Tie Connector- Post Beam Connection on 2 Center Posts


    Day 2 Work Photos

    • Upper Stairs and New Deck Boards
    • 3- 2x12 Stair Stringers
    • 7 3/4in Risers
    • 10 in Tread

    Upper Stairs and New Deck Boards


    • Upper Stairs
    • New Deck Boards
    • New Upper Railing

    Upper Stairs,New Deck Boards,New Upper Railing


    • Removing Lower Stair Case


    Removing Lower Stair Case


    • Adding 2x8 to Existing Double 2x8 Joist- 3 Total 2x8- Combination of 16 Galvanized Nails, Screws, Glued, and 2-1/2 x 8in Bolt, Nut, Washer


    Adding 2x8 to Existing Double 2x8 Joist- 3 Total 2x8- Combination of 16 Galvanized Nails, Screws, Glued, and 2-1/2 x 8in Bolt, Nut, Washer


    Scotty-Scotts Contracting, St Louis Renewable Energy


    Thank you for stopping by St Louis Renewable Energy. Feel free to comment in the section below or contact Scotty for any Home Improvement Projects or Energy Reducing Needs and Scotty, Scotts Contracting will respond ASAP.

    2.17.2012

    Fixing Deck Rails on Porches, Decks, etc

    One of my latest repair projects:


    • The 2nd Floor deck support rail was leaning away from the building creating a Safety Issue for anyone who leaned on the Support Rail.  
    • I used a Ratcheting Tie Down Strap to pull the deck support rail straight.  (In the following diagram you will see the connection points for Plumbing up the deck rail on the 2nd Story Deck.)
    • After the Support Rail was re-plumbed I reattached the connection point at the Buildings Masonry wall with 4- 3/8 x 5 1/2 Lags and Masonry Anchors, spaced at 8in OC.


    Apply Tension and Pull Towards Building


    Scotty Adding 3" Deck Type Screws to Secure Support Rail to Deck
    • I also replaced the original nails that had pulled loose with 3" Deck Screws
    • I then added a 2x4x14' to hold the Deck Rail into position.  (See Action Photo Above)


    Anchor to Wall w/ Lag Screws and Concrete Anchors


    Thank you for stopping by St Louis Renewable Energy. Feel free to comment in the section below or contact Scotty for any Home Improvement Projects or Energy Reducing Needs and Scotty, Scotts Contracting will respond ASAP.

    Connect with Scotts Contracting

    FB FB Twitter LinkedIn Blog Blog Blog Blog Pinterest