-- Scotts Contracting - StLouis Renewable Energy: Scotts Contracting

Search This Blog

Showing posts with label Scotts Contracting. Show all posts

3.19.2012

Removing Birds Nest Fire Hazard From Exhaust Vent on Gas Heater

Removing the Fire Safety Hazard that a St Louis Building Code Official Missed
Removing the Fire Safety Hazard that a St Louis Building Code Official Missed 
Thank you for stopping by St Louis Renewable Energy. Feel free to comment in the section below or contact Scotty for any Home Improvement Projects or Energy Reducing Needs and Scotty, Scotts Contracting will respond ASAP. Company Web Address: http://www.stlouisrenewableenergy.com

3.05.2012

Saving a Deck From the Landfill Part 3-


Day 4 Photos of the Structural Deck Repair- 
Installing the Handrails
Rebuilding the Lower Staircase
Simpson Strong Tie Connectors


 "Bring the Deck to Current Building Codes or Tear It Down


Part 4- Saving a Deck from the Landfill will post soon ( Power Washing and Paint Next Steps)


Day 4


  • Upper Staircase
  • Hand Rail
  • Bracing
  • Clean Up
Upper Staircase Completed

  • Simpson Strong Tie Connector for Post Beam Location
Simpson Strong Tie Connector Post Beam Location


  • Simpson Strong Tie Connector for Staircase Stringers
Strong Tie Stair Stringer Support Straps 20 ga


  • Lower Staircase
  • Hand Rails
  • Bracing
Completed Lower Staircase 


  1. All Structural Issues Passed Inspection Mar 5, 2012
  2. Power Washing and Paint Next Steps


Thank you for stopping by St Louis Renewable Energy. Feel free to comment in the section below or contact Scotty for any Home Improvement Projects or Energy Reducing Needs and Scotty, Scotts Contracting will respond ASAP. Company Web Address: http://www.stlouisrenewableenergy.com

3.03.2012

Saving a Deck From the Landfill Part 2- Rebuilding the Lower Staircase


Day 3 Photos of the Structural Deck Repair- 
Rebuilding the Lower Staircase


 "Bring the Deck to Current Building Codes or Tear It Down
Part 2- Day 3
  • Lower Stair Case
  • 1x8 Risers
  • 2x12 Treads

Rebuilding the Lower Staircase- 2x12 Treads with 1x8 Risers


  • Lower Stairs Top View
Lower Stairs Top View


  • Simpson Strong Tie Connector
Photo will post soon
  • Upper Stairs
  • 1x8 Risers
  • 2x12 Treads

Upper Stairs Side View 2x12 Treads with 1x8 Risers


Part 1- Saving a Deck from the Landfill 
Part 2-Saving a Deck from the Landfill
Part 3- Saving a Deck from the Landfill will post soon


Thank you for stopping by St Louis Renewable Energy Green Blog. Feel free to comment in the section below or contact Scotty at the new company website http://www.stlouisrenewableenergy.com for any Home Improvement Projects or Energy Reducing Needs and Scotty, Scotts Contracting will respond ASAP.

2.29.2012

Saving a Deck from the Landfill


Deck Repair by Scotty-Scotts Contracting, St Louis Renewable Energy

Because the Deck was not built to current Building Codes the St Louis Building Code Department required- 
"Bring the Deck to Current Building Codes or Tear it Down"
  1. Structural Site Inspection and Documentation of Needed Repairs of the Deck by an Architectural Engineer,
  2. Obtain a Repair Permit (based on the Engineers findings) for the needed repairs,
  3. Structurally reinforce the existing deck to the Suggestions made by the Architectural Engineer,
  4. Repair other areas that are in disrepair
  5. Have the added “Structural Work” Inspected by the St Louis Building Code Official
  6. Power Wash and Paint
  7. Final Inspection by the St Louis Building Code Official and Property Owner


Day 1 Work Photos
  • Add ½ in by 8in Lag Bolts at 16in OC at Joist House Connection to existing 3/8 in Lag Bolts
    Add ½ in by 8in Lag Bolts at 16in OC at Joist House Connection to existing 3/8 in Lag Bolts, Scotts Contracting, St Louis Renewable Energy 

    • Additional Photo of Added Lag Bolts to Joist Wall Connection

    Additional Photo of Added Lag Bolts to Joist Wall Connection


    • Lag Bolts at 16in OC the Entire Length of the Joist

    Lag Bolts at 16in OC the Entire Length of the Joist 


    • Temporary Support for Safety and to make sure the Deck Stays True and Plumb while we added the Double 2x8 Main Support Beam
    • Note: I don't really think the Deck would have collapsed onto the crew while working on the Main Support but for Peace of Mind I went ahead and installed a Temporary 2x4 Post and Beam.
    Temporary Support for Safety


    • Note: Simpson Strong Tie Connector- Post Beam Connection on 2 Center Posts
    • Outer Post utilize 2- 1/2 x 8in Bolt, Nut, Washer

    Simpson Strong Tie Connector- Post Beam Connection on 2 Center Posts


    Day 2 Work Photos

    • Upper Stairs and New Deck Boards
    • 3- 2x12 Stair Stringers
    • 7 3/4in Risers
    • 10 in Tread

    Upper Stairs and New Deck Boards


    • Upper Stairs
    • New Deck Boards
    • New Upper Railing

    Upper Stairs,New Deck Boards,New Upper Railing


    • Removing Lower Stair Case


    Removing Lower Stair Case


    • Adding 2x8 to Existing Double 2x8 Joist- 3 Total 2x8- Combination of 16 Galvanized Nails, Screws, Glued, and 2-1/2 x 8in Bolt, Nut, Washer


    Adding 2x8 to Existing Double 2x8 Joist- 3 Total 2x8- Combination of 16 Galvanized Nails, Screws, Glued, and 2-1/2 x 8in Bolt, Nut, Washer


    Scotty-Scotts Contracting, St Louis Renewable Energy


    Thank you for stopping by St Louis Renewable Energy. Feel free to comment in the section below or contact Scotty for any Home Improvement Projects or Energy Reducing Needs and Scotty, Scotts Contracting will respond ASAP.

    2.19.2012

    Spray Insulating Foam Deal of the Week

    If you have ever wanted to super insulate your home or business against the cold and heat and protect the bank account from the rising costs of our Electricity Rates - Ameren UE and New Gas Rate Hikes - Laclede Gas.  The following offer I received from a couple of my Spray Insulation Dealers is just what your Bank Account needs.


    ISOCYANATE PROMOTION
    While Supplies last we are offering our customers 500 lbs of PMDI Isocyanate forbelow wholesale prices!! Compatible with most all spray foam products, very clean, high quality ISO.

    YOUR PRICE$ 650.00


    Promotions running on 500lb Iso's and system pricing on our EcoGuard 500 and EcoTite 1200.  Let us start helping you save money today!


    • EcoSeal 500 .5 OPEN CELL foam.  18,000 board feet yield, odorless and excellent adhesion.
    • EcoTite 1200 1.2lb open cell spray foam.  R-Value 5.0 per inch. 3.55 perms per inch, has a tensile strength close to closed cell foam. No scraping or scarfing, Odorless products
    Syenergy Spray Foam Specialists offers a broad range of innovative solutions to meet all your needs. Whether big or small, our products are made with precision, in accordance with the highest quality standards.  All Syenergy spray foam products are custom blended when you order to insure the highest quality and the freshest material. You can rely on our products to get the job done right!

    An overview of our Products:

    Syenergy 500- Renewable Resource Based .5 lb Open Cell Spray Foam Insulation. Passes the NFPA 286 Appendix X with no thermal barrier or intumescent coatings. Read More....

    Syenergy Seal 500 - Class one .5 lb Open Cell Spray Foam Insulation with an R value of 3.83 per in. We use low odor catalysts and it will not cause a "blue haze" for installers. Read More....

    Syenergy 1200 - Is a Hybrid Open cell foam insulations with a high R value of 5 per inch. Read More....


    Syenergy 1800W & 1800 245fa– Class one thermoset 1.7 and 1.8 lb. water blown Closed cell Spray Foam Insulation that has a high r value of 5.5 per inch and contains the highest level of agriculturally based renewable resources content available on the market.Read More….


    ECOSAFE Spray Foam Insulation is the newest SPF company to the market. Our goal is to produce the most technologically advanced products at the most affordable price. Homeowners demand the safest, greenest products for their home and ECOSAFE strives to deliver. Our certified contractor program encompasses all areas of the spray foam business, so that every time a contractor installs ECOSAFE products, it is installed to our specifications.
    Spec Sheets

    Company Website:
    Company website: http://www.syenergyfoam.com/


    Schedule a Free Green Site Evaluation at the Web Locations Below and Scotts Contracting will respond as fast as humanly possible.

    Twitter         <----    Find Me   --->         Facebook


    2.11.2012

    New Company Website for St Louis Renewable Energy


    Scotty-Scotts Contracting, St Louis Renewable Energy has just finished the New Web Site http://stlouisrenewableenergy.com, in partnership with the New Google Small Business Promotion.


     If you’re looking for high quality and personal service, you’ve come to the right place. At Scotts Contracting we’ll give you the attention and personal service you’ll come to expect and enjoy.                         


    We will not leave you high and dry or take your money and run like the "other contractors" operating in the St Louis Region.


    Complete List of Services 
    Provided by Scotts Contracting​
    • Roofing
    • Flooring
    • Interior
    • Exterior
    • Additions
    • Remodeling
    • Rehabbing
    • HVAC
    • Plumbing
    • Electric
    • Doors / Windows
    • Weatherization
    • Insulation
    • Climate Control
    • Kitchen / Bath
    • Basement
    • Water Proofing
    • Painting
    • Staining
    • Custom Wood Work
    • Special Finishes
    • Tuckpointing
    • Siding


    11.01.2011

    Repairing Concrete Steps-Hints-Suggestions-Photos


    Repair It-Don’t Replace It-Concrete Steps

    Repairing Concrete Steps instead of Replacing-Job Notes, Suggestions, and Hints.

    Whether it is downturn of economy or people choosing to save money, many of my clients are choosing to “Repair rather than Replace” the materials used in the construction of their home or business.

    If you decide that this type of DIY concrete repair is more than you can handle on your own.  Scotts Contracting is available to assist you in your project.  Fill in the form (provided below) and Scotty will respond asap to your request.

    In the photos you can see:

    1. How the prior concrete patch job had deteriorated and made the Concrete Steps a Safety Issue for the homeowner.
    2. Quick and Easy Concrete Form for Repairing Concrete Walkway
    3. Materials used to Repair / Resurface the Concrete Steps (Home Depot Products)


      • Rapid Set Cement – Multi-Purpose Construction Material
      • Quikrete 1-Gallon Concrete Bonding Adhesive
      • Quikrete 1 qt. Acrylic Fortifier
      • Concrete Reinforcing-#4 Rebar- 1/2 in.
    4. Tools needed to accomplish Concrete Step Repair
      • Darby
      • Hammer-Drill w/ 1/2 Concrete Bit and Flat Bit
      • Concrete Floats and Edgers
      • Screw Gun
      • Clamps
      • Wire Brush
      • Buckets
      • Broom/Brush
    Before Photos of Concrete Step and Walkway Repair
    Photo 1)
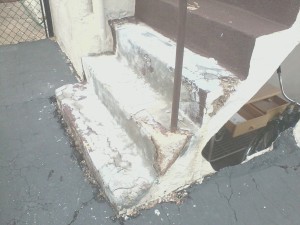
    Before Photo of Concrete Step Repair
    Before Photo of Concrete Step Repair
    Photo clearly shows how the prior concrete patch had deteriorated into an unsafe and hazardous condition.
    Question: Why did the prior concrete patch fail?
    Answer: To the best of my knowledge whomever did the prior patch did not use:
    1) Surface Bonding agent and
    2) Concrete Additive to form a tight bond against the elements and use
    3) Prior to patching the area may not have been cleaned which allowed the patch to work loose in time


    Photo 2)
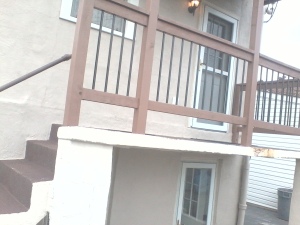
    Concrete Walk Repair
    Before Walkway Repair


    Photo 3)
    Concrete Form for Repairing Concrete Walkway
    Concrete Form for Repairing Concrete Walkway
    Inexpensive Concrete Form used to repair edge of Concrete Walkway.
    1) Concrete Form consisting of 2- 1×4 or 1×6 Screwed together and clamped to edge of Walkway


    Photo 4)
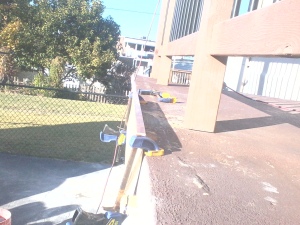
    Concrete Form for Repairing Concrete Walkway #2
    View #2 Edge View for Concrete Form for Repairing Edge of Concrete Walkway
    Edge View of Concrete poured into the Concrete Form used to repair edge of Walkway
    Note: Before concrete was poured into the form it is suggested by the manufacture to:
    1) Clean Area completely of any substances that will inhibit the new concretes adhesion properties.
    2) After cleaning and prepping area: Apply a surface bonding agent (Concrete Glue) to the area with an old paint brush; carefully working the Adhesive into all cracks and crevices.


    Photo 5)
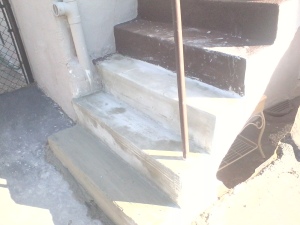
    Repaired Concrete Step
    Repaired Concrete Step
    Notes:


    Photo 6)
    Close Up of Repaired Concrete Step
    Close Up of Repaired Concrete Step
    Notes: Notice how the Fast Dry Cement Patch is drying ( white areas compared to grey area )
    Broom finish used for traction on the steps and the finished texture


    Photo 7)
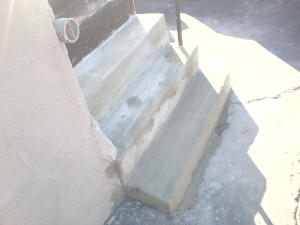
    View #2 After Repair
    View #2 After Repair
    This photo was included to point out the transition between the Step and Landing zone.  The area was filled with concrete to inhibit future seep-age of water from entering the area and further deteriorating the Foundation of the Home.


    Hints and Suggestions:
    1. To increase the life expectancy of this concrete patch and increase the adhesive properties.  (A)An acrylic bonding agent was used in the mixture of Concrete and Water. (B) Surface Bonding Agent applied to clean surfaces before patch was installed.   The working time for the patch will be under 15 mins.  Only mix enough patch to work small areas ( 1/4 of a 5 Gal Bucket at a time )
    2. When repairing steps if at all possible start at the top step and work down
    3. Clean Hand Trowels often to remove adhesive from the Acrylic Agent for a smooth finish that can later be worked into the finished texture (Broom Finish or Swirl Finish)

    If you decide that this type of DIY concrete repair is more than you can handle on your own.  Scotts Contracting is available to assist you in your project.  Fill in the form (provided below) and Scotty will respond asap to your request.


    Part 8: 1st Floor Weatherization

    Part 9: See the Difference a Little White Paint Makes

    Part 10: Interior Framing-Plumbing-Laundry Room

    Part 11: Kitchen Framing Tip #36-Benton Rehab Project

    Part 12: Water Main Repair- Benton Rehab

    Part 13: Benton Rehab Project Drywall Installation and Tip: Number 1172
    Author Green Building Design and Construction
    Green-Sustainable Design-Construction Service for Home and Business- Repair and Improvements for St Louis, Green Products,Insulation, Weatherization, Solar, Home Improvement. My Green Dream is to build a GREEN St Louis find green news at: http://stlouisrenewableenergy.blogspot.com or http://scottscontracting.wordpress.com

    Connect with Scotts Contracting

    FB FB Twitter LinkedIn Blog Blog Blog Blog Pinterest