10.30.2009
Its simple: Reducing Energy Needs - Reduces Climate Change
10.29.2009
US Dept of Treasury,Payments for Specified Renewable Energy Property in Lieu of Tax Credits
Note: Eligible property under this program includes only property used in a trade or business or held for the production of income. Non business energy property, such as property used for residential purpose, does not qualify under this program.
Further requirements: If your organization falls under any of the below designations, you are not eligible for Section 1603 payments, and should not continue with the application process:
* Federal, State, or local government or any political subdivision, agency, or instrumentality thereof
* Organization described in section 501(c) of the Internal Revenue Code and exempt from tax under section 501(a) of such Code
* Entity referred to in paragraph (4) of section 54(j) of the Internal Revenue Code
* Partnership or pass-thru entity with a government or any political subdivision, agency, or instrumentality thereof, 501(c) organization, or 54(j)(4) entity as a direct or indirect partner (or other direct or indirect holder of an equity or profits interest)
* Foreign person or entity not qualifying for the exception in section 168(h)(2)(B) of the Internal Revenue Code with respect to the property
Instructions: Type your email address in the box below and click Register to set up your user name and password.
Email:
Email:
* Register
IMPORTANT: Please make sure you can receive communications from treas1603@nrel.gov from your email provider. This may entail reconfiguring you spam filter, adding this address to your "whitelist," or asking your administrator to unblock this address.
10.28.2009
Energy Headlines
President Obama announces $3.4 billion investment in smart grid
President Barack Obama is announcing $3.4 billion in grants to help build the smart grid, according to the White House.
Carolinas nuclear facilities boost area economy
The Carolinas nuclear industry tops 37,000 jobs, more than $2 billion in payroll and more than $750 million paid in state and local taxes.
Production begins from Cormorant field well
A sidetrack from the CN30 well on the Cormorant field has started production, according to TAQA Bratani. The well is expected to produce around 10,000 boe/d.
GAC Group establishes arctic base
GAC Group has established a base on the Svalbard archipelago in the Arctic Ocean, halfway between mainland Norway and the North Pole. The company has also teamed with Pole Position Spitsbergen to form GAC-Pole Position
10.25.2009
Renwable Energy
10.24.2009
Solar Panel Design
How to make sense of the above numbers:
The basic and very important formula you need to know to make sense of solar cells is this:
Power (P) = Current (I) Multiply by Voltage (V), or P=I*V
Power's unit of measure is watt,
Current's unit of measure is amp,
Voltage's unit of measure is volt.
So in our solar cell's specific example, if each solar cell is rated at 1.75 watts on average, and the voltage is 0.5, you do a little algebraic math, then to get the amps (I), since P=I*V, so I = P / V , therefore I (amps) = 1.75 watts divided by 0.5 volts = 3.5 amps.
It's important to understand the concepts of series connection and parallel connection when stringing these solar cells together to make a solar panel. Series connection of the cells increases voltage but not amperage; parallel connection of the cells increases amperage but not voltage. Series connection is when you connect the positive terminal of a cell with the negative terminal of the next cell. Parallel connection is when you connect the positive terminals of all cells in the set of cells with a tabbing wire and all the negative terminals of all cell in the same set. You can use a combination of series and parallel connections to get the right voltage and amperage for your solar panel.
The cell specifications above were given to us by the manufacturer as averages. Variations are possible. To make a 18 volts panel, for example, you connect 36 cells in series (36 cells times 0.5 volt each = 18 volts). And 36 * 1.75 (each cell in theory averages 1.75 watt) watt = 63 watts. The amps you will be getting is 63 watts divided by 18 volts = 3.5 amps.
Solar cells basics:
The front of the cells (blue side, aka Sunny side) has two thick white lines, called bus bars. They are the negative terminals of the cell. The back side, where the 6 square dots are, are positive terminals. Connect the tabbing wires from the bus bar of the first cell on one side to the three dots of on the back side of the next cell. That way you have a series connection. Repeat the process on the other side of the cells. In panel making you should connect all the tabbing wires on the front for all the cells first, then flip the cells over to solder the back side in a second step. Some solar cells such as SunPower cells have both positive and negative terminals at the back of the cells, but we don't have to worry about them. Most cells are negative on the front and positive on the back.
The white color bus bars on front and the contact points on the back are made out of silver, and you should keep them intact. Apply solder on your them and the wires should bond.
Testing:
Make sure that you test the cells under strong sun light with the front of the cell facing the sun, at the same time connect your meters to the right terminals. If you are inside the building, make sure you shine your sun simulating lamps onto the front of the cell while testing.
Panel configuration:
For those who are new to solar panel making or if you don't have an engineering background, here is our recommendation:
1) Make small panels first so you gain experience.
2) In most situations, make either 36 or 72 cell panels, and connect them in series. 36 cells give you 17.5 or around 18 volts or so. And 72 cells doubles that. These panels are very useful, and you will find a lot of matching products that will want to buy! For example, you almost always want to use a charge controller if you make your panels to charge batteries. Charge controllers usually come in 12 or 24 volt settings, which match your panels' 18 and 36 volts very nicely. Yes, your panel voltage should be 1.5 times the voltage of the battery you intend to charge. Connect more panels together if you want to tie to the grid, in which case, always use an inverter. However, we always recommend that the panels that you make for yourself be used in off-grid applications, such as charging your batteries to be used in RV, remote cabin, or marine settings. If you intend to connect to the grid, it is wise to buy the professionally made, UL certified panels.
3) For a lot higher voltage panels and configurations and connecting multiple panels to get high voltage, consult a professional. Just don't fry yourself. Remember that solar panels are always loaded with electricity when exposed under the sun. At high voltage even a tiny bit of current, when handled wrongly, can kill you.
Soldering:
If you want to become a serious panel maker, buy a good soldering iron whose temperature can be adjusted. Don't get a cheap iron. It's one of the most important tools you need to have. If you can't buy an adjustable solder iron, get one that's rated at 90 watts. Also when you solder, all you need to do is to apply flux on the bus bars and the backside contacts before soldering. Do NOT scrape off the whitish substance on the bus bar or the backside square contacts. Those are made of silver and must be kept intact. Just apply flux and solder the tabbing wires. The wires are already coated with tin solder so you don't need to use extra solder AT ALL. Use a smooth and continuous motion to solder the wires onto the bus bars of the cells.
10.23.2009
The reduction in energy use would also result in the abatement of 1.1 gigatons of greenhouse gas emissions annually – the equivalent of taking the entire U.S. fleet of passenger vehicles and light trucks off the roads
We Could Save $1.2 Trillion Over Next 10 Years
According to the latest figure put out by McKinsey, if we invested $520 billion over 10 years in energy efficiency measures from weatherizing homes to better power systems, we'll see a savings of $1.2 trillion by 2020 - a return of $680 billion. Plus, that other great side effect of making big strides towards saving the planet.
Just how big a stride? Well...
The reduction in energy use would also result in the abatement of 1.1 gigatons of greenhouse gas emissions annually – the equivalent of taking the entire U.S. fleet of passenger vehicles and light trucks off the roads.
We Already Have Tools We Need for Energy Efficiency
Best of all, we don't need to sit around waiting for new technology. The report shows that we can use existing tech and practices to make the changes necessary for such big savings.
As reported on CNET, "If we do nothing, we will waste $1.2 trillion of energy," McKinsey partner Ken Ostrowski said in a press conference on Wednesday. "Over a decade, (the up-front investment) would be $50 billion a year, which is about five times what we invest today. That investment pays back--it's one of the few that generate environmental benefits and economic cost returns."
Big Energy Savings In Homes, Businesses and Industrial Sectors
Could the importance of energy efficiency be hammered home more clearly than that? Homes and businesses could save 28% of their current spending, and the industrial sector could save 20% by doing just the basics that we already know about. For instance, standby power is 6-8% of the total energy consumption - and we already have technology to cut back on these issues.
Getting Everyone On Board for Energy Efficiency
The report outlines five opportunities that will help us overcome some of the barriers and realize savings, including showing everyone that energy efficiency is honestly as big a deal as TreeHuggers make it out to be, get everyone over the hump of not wanting to spend money upfront to make changes that will help them realize future savings, and better align everyone involved in energy from utilities to government agencies to manufacturers to consumers.
\
Web Links Provided
-=-=-=-=-=-=-=-=-=-=-=-=-=-=-=-=-=-=-
(Sponsor Advertisement)
Slash Your Home Energy Costs Without
Adding A Single Watt of Extra Energy
Or Compromising Your Lifestyle
- by Peter Lindemann
10.21.2009
DIY Solar Panels
I found the following article via
the web at the sites supplied below.
I hope you find the information usefull!
Build your own Solar Panel
 |
| how to build solar panels from scratch |
Because I think that the price of a solar panel is still pretty high(in Europe), and because the stimulation from our government (in the Netherlands) is not so good (very,very complicated and time consuming) I started the project of building my own solar panel. I would like to invite anyone who has some experience with this or is interested in it ,to give me any advice or remarks about it. The main challenge is to build a panel that can withstand heat, cold, rain and hail for many years.
Buying My First Solar Cells
In October 2008 I bought my first 100 cells via Ebay. But as I later learned, they were still very expensive: 300 Euros for 100 cells, including shipping. I was told they should produce 1,98 Watt each. Below a picture :The First Solar Cells
After some experimenting and very long brainstorming about how to continue, I found another seller on Ebay who had the same cells (of which he gave the specification that they were 1,75 Wp each……) But these were slightly damaged. Well I decided to buy 500 cells ,a mix of 3 different qualities. The seller had not counted these cells but there were 620 cells, of which after a first selection , just over 500 were reasonably good. Not a bad deal to start with. And a lot cheaper! Also now I had over 100 cells for practice on soldering and handling.
 |
| The 620 Cells! |
Building the First Small Panel.
Well I got started. Beginning with the soldering-technique, that takes some practice, but after a while you get the hang of it. And now my first small experimental panel is ready! The main focus and moreover challenge is to get the cells 100% sealed: air and water tight. The cheapest solution for me is to make a double-glass construction. And the cells in between the 2 plates of glass. The panel is made of 12 cells, each 0.55 Volts. On the picture below you can see many purple coloured wires. Those wires are each connected in between each cell so afterwards I can still do some measurements to compare each separate cell. |
| My First Do-it-yourself Solar Panel! |
The First Measurements in the Sun
I must say that at first I was worried whether I would see the cells really produce the power they should. But after building a variable resistance (making it possible for me to roughly find the maximum power point) the sun at last was shining (not much sunshine here beginning of February) and I got my first real measurement : 15,5 Watt. According to the specifications the panel should give a maximum of 12 x 1,75 W = 21 Wp.Given the fact that the glass takes away about 10% of the power,without the glass it would have been about 17 Watt. I expect that during summer as the sun rises much higher above the horizon, the measurement will give higher readings , thus coming closer to the specifications…. I am using normal 4 mm (0.16 inch) glass because it costs me nothing. If you just look around near places were they renovate old houses you can get the old glass for free…… This compared to the real stuff they use for solarpanels which is quite expensive and probably very difficult to find.
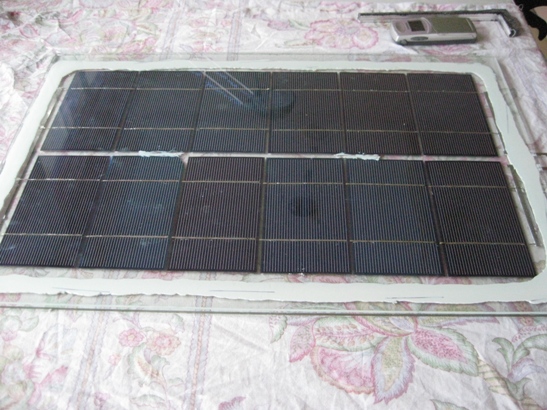
Influence of Heating the Panel in the Sun.
During the first measurements, I found that the heating up of the panel was pretty strong. But this especially was the case for the backside. were the cells are glued upon (using the same kit I used for glueing and sealing the panel). This panel is 12 mm (0.47 inch) thick : 2 plates of glass each 4 mm (0.16 inch) and 4 mm in between. What troubles me is the temperature-difference between the front and backplate of glass. This will result in different expansions creating stress on the sealing,if that is repeated too often it will start leaking. Now I am using the same kit as is being used in solar panel factories. But it still worries me. A solution can be to keep the panels small, so the difference in expansion stays minimal.Improvements
A solution to the temperature-problem can also be to make the gap between the 2 plates of glass smaller. So the heat will be more evenly dissipated to both the front and backside ( thereby also creating more cooling capacity). My next panel (picture below) is the same size,the difference is the distance between the 2 plates of glass : it is now 1.5 mm (0.059 inch) …..and this also makes the sealing a lot easier and thereby better. I have used pieces of copper winding wire that I happened to have : 1.2 mm (0.047 inch) thick. I took several pieces of about 3 cm and spread them evenly along the side on the glass backplate. Then the kit along them all around the full edge. And finally pressed the front plate on it. The result is a gap between the plates somewhere between 1.2 mm and 1.5 mm. So on the inside, there is some trapped air (with, of course, a certain amount of humidity in it), which can potentially cause condensation. But my hope is that the amount of that is so small (only very small amount of air……) that it will not be a factor…… ( In the first panel I did put some stuff that can “eat” the condensation. I got this out of old double glass that I separated,the stuff is inside the aluminum strips between the double glass edges) |
| The Improved Panel |
The kit will have to dry for a few days, but anyhow the weather forecast does not indicate any sunshine the coming days………
First Results
Bottom line is that if the output of each cell really hits 1,75 Wp then I can come to a price of Euro 1,20 per Wp (or even lower than that….) And with such a price the panel will not have to last for 20 years……..but off course that is my aim ! That will be the main challenge ! But I must say with this second panel my hopes are getting higher.Well, who feels like building panels also ? Or give me some advice, or share experience. I do not mind getting negative critics because they might be correct………and they are there to be solved !
- Do you like this article? Share it with others:
Scotty writes:
I found the following article via
the web at the sites supplied below.
I hope you find the information useful!
- “Build your own Solar Panels.
This website has been created to present the information I have learned from building my own solar panels. Using common household materials and tools, I was able to build quality panels as durable and efficient as commercially bought panels. Altogether the panels cost less than cheap panels of comparable wattage and I fully expect a long life from them....
...If you are mechanically inclined enough to cut plexiglass and wood to size, I am sure you will find this process much easier. If you are the type that worries about cutting everything correctly, this panel is much more forgiving, and you still end up with a high quality panel...”
You can see the jig I made for spacing the cells while soldering. It is a supermarket savings card, cut in pieces and super glued to Masonite.
I laid them out so they could be connected together in series.
I put small dots of epoxy in spots to keep everything from moving around. I didn't put any epoxy near the ends because I had to solder on the bus bars. I slid a piece of paper underneath the cells while I soldered on the bus bars, so no flux would get on the clean glass.
If you epoxy all four corners, the paper will wrinkle under vacuum.
The epoxy keeps the paper from moving while you put the laminate over it.
I have found Free Solar Panel Info
10.19.2009
WE HAVE A CHOICE!
10.18.2009
10.15.2009
10.14.2009
Blog Action Day 2009, Contact the President
Add your name to those across the world calling on President Obama to lead on climate change
Renewable Energy Jobs
Is Your Company Looking for New Talent? Promote Your Job Opportunities at America's Largest B2B Solar Event! Act Now - All Jobs Must be Posted by October 12th to be Featured On-Site in Anaheim. It's Easy Post Your Jobs Today at SolarPowerInternational.com/
| | |
For More Information or any Questions Contact:
Katharine Hart k.hart@RenewableEnergyWorld.Blog Action Day 2009
Blog Action Day 2009

10.13.2009
Annual Average Daily Solar Radiation
St Louis, MO Annual Average Daily Solar Radiation
Latitude: 38.75 N Degrees Longitude: 90.38 W Degrees Elevation: 172 Meters System Tilt: 40 Degrees Annual Total BTU's per square meter (10 tubes): 3,944,543

This page provides solar radiation values for Thermomax Solar Collectors and expected gallons of water raised by 60 degrees F. The average daily radiation data are from University of Wisconsin EES Report No. 44 - 2 (F - Chart Data). Thermomax collector (average) efficiency of 70% is used for this chart.
10.12.2009
Operation Free...... Repower America

| Dear Buz, We have been organizing gatherings all across Missouri to build up support for clean energy legislation and to encourage our elected officials to become leaders in ending the climate crisis. If you haven't been able to attend one yet, I hope you will join us at Operation Free's event in Saint Louis, Missouri. Operation Free is a coalition of leading Veterans and national security organizations who recognize that climate change is a major threat, and support immediate, bold action. Here are the details: Operation Free VFW Post 3500 1717 South Big Bend Boulevard Saint Louis, MO 63117 Tuesday, October 13th 6:00 PM RSVP today. We need your help to make sure your neighbors and friends know the truth about clean energy. And we need our elected officials to see the strong support for clean energy here in Missouri. Will you join us in Saint Louis? Yes, I'll be there. Sorry, I can't make it, but I still want to get involved with Repower Missouri. I'm looking forward to working with you to bring clean energy to Missouri and across our country. Thanks, Andy LaVigne State Director |
10.11.2009
Understanding the US Power Landscape
Makes plans now to attend:
"Understanding the US Power Landscape"
| Date: | Thursday, October 22nd | |
| Time: | 1:00-2:00pm Eastern | |
| Register: |
Missouri Incentives/Policies for Renewables & Efficienc
10.08.2009
Solar Industry JOBS
10.07.2009
Clean Coal
10.06.2009
GREEN ZONE at the St. Louis Business Expo
|
10.02.2009
Renewable Energy Grant Money "HOW TO"
How To Get Renewable Energy Grant Money from the U.S. Government
Q: How does one go about applying for the new government program that allows a solar, wind project or other specified energy property to receive a cash grant from the U.S. Treasury in lieu of a 30% tax credit? -- Michael W., Hartford, CT.
A:Michael, I’m glad you asked. As someone who recently completed this process, I can tell that there are multiple steps but the process works.
The entire application is online. First, you go to the United States Department of the Treasury's Application Submission Page for payments in lieu of tax credits for specified energy property. These payments are authorized by Section 1603 of The American Recovery and Reinvestment Act's tax title signed into law on February 17, 2009.
Once you are on the site, you need to check out the guidance section by clicking the link under the first two paragraphs. For the guidance document, Terms and Conditions, and sample application form, go here.
Here in the guidance section, you will find a complete example of a submission and all of the other material you will need to go ahead.
It is especially important to make sure to then scroll to the bottom of the page to the Important Reminder section. Here you will need to apply for a CCR – a Central Contractor Registration. You must get a CCR number there before you will be allowed to proceed with your application. To apply, you’ll need your DUNS number, your Tax Identification Number (TIN) and various other pieces of information about your business.
Once you have been assigned your CCR, you return to the original submission page, here.
At this point you can pick a username and password from the submission page and proceed to fill in the submission document. You will need:
- Complete details of the project,
- Full accounting as to all expenses and
- A number of other items, which are described in the document
Bear in mind that there is a lot of requested information to fill in, but it is well worth it. If you take it one step at a time you will be fine.
The Obama administration and the U.S. Treasury have, in my opinion, made the government proud. They actually came up with an excellent idea – Cash instead of tax credits – and implemented it quickly and ahead of schedule!
In fact, they promise that after the application has been accepted as complete that they will review the document and pay the grant within 60 days. Sounds fast, doesn’t it? But I am here to tell you the good news. We applied for such a grant for our building, a 550-kW PV system at 60 Shelter Rock in Danbury CT on the first day that the government was accepting applications and we received our grant in the first round of grants via wire transfer in approximately 10 days from start to finish!
I think that my project is a good real world example of the type of new ideas and leadership that the new administration is encouraging to help the renewable energy industry prosper and grow.
If you have a renewable energy project and you’d like some help applying for a grant, feel free to contact me.
Good luck!
Featured Post

-
Coalition for the Environment flat out opposes second nuclear plant | More ...
-
Join us on an extraordinary journey as two lifelong friends, Francis and Benoit, turn a crumbling, centuries-old castle into a stunning 4-st...
-
Thank You for stopping by the Green Blog. If additional information in needed or you have a question let me know by posting a question or ...

