Showing posts with label DIY Solar. Show all posts
Showing posts with label DIY Solar. Show all posts
1.06.2022
8.28.2014
Solar Deals-Make Solar Affordable Now
If you have ever thought a clean energy solar system was out of your league and price range. Check out the Solar Products from one of my solar suppliers that proves this isn't true any longer- message 8/28/14 -
Solar and Wind Deals- Solar is Affordable NOW
Scotty Adds:
- Bulk pricing discounts for container loads of solar panels. (get your StLouis neighbors to join and reduce your solar costs for labor, permitting, and materials-can equal up to 30% savings of the total costs)
- Pay attention to the location as shipping will factor in on the final costs for your clean energy project.
- Here in St Louis I've noticed quite a few of the solar panels installed around the city are the little 250w panels.
- Before you take the advice of someone peddling older model solar panels-compare the "output to cost" of a higher wattage panel or even a Large Format 72 cell panel with over 300w of power.
- Since roof space is limited on many buildings it only makes sense to install the highest wattage of panel that you can afford giving you more bang for your buck-with less hardware, labor, and materials to buy.
 |
| My First Solar Car! :) |
ALL the following equipment is NEW, never used UNLESS otherwise noted.
- 125 kw of Trina 280w poly panels sitting in Honolulu Hawaii, MAKE OFFER!
- AEI 333 kw 480 volt 3 phase inverter, MAKE OFFER!
- 1 Megawatt of Beida-Solar 230w panels, sitting in California....MAKE OFFER!
- Qty. 5000, LED 'Par 38' lights, 12 watts each 650 lumens ("60 watt equivalent") soft white, UL listed, ...MAKE OFFER!
- 150 Sunpower 327w, T5 panels, pre-owned (but only installed for 9 months)...MAKE OFFER on entire lot!
- ET Solar 285w poly panels, 74 cents a watt for entire lot of 200 kw.
- Lightway Solar 285w poly panels, NON-UL for EXPORT ONLY, 56 cents a watt! East coast.
- Used Kyocera 120 watt panels, 37 cents a watt, minimum 4 pallets order (100 panels). Sitting in California.
- 750 kw of Grape Solar 235w panels, available on TERMS of NET 2 YEARS!! Call for details!
- 1.7 Megawatts of TRINA Solar 245w poly panels, 67 cents a watt for all, or minimum 40' container loads. Sitting in California.
- Qty. 299, TRINA SMART (Tigo on board) 250w poly panels with built-in panel-level monitoring system, 97 cents/w OR BEST OFFER for ALL!! Works with almost any inverter! Ask for details.
- Solartec 250w mono panels, truckload sitting in Texas, 69 cents a watt. ALSO have 300w poly & 310w mono for similar pricing, depending on qty.
- GCL 245w panels, 67 cents a watt pallet qty. Sitting in PA.
- Trina Solar 285w & 290w poly panels, 76 cents a watt pallets, 74 cents/w for 100 kw+ qty.
- Topoint 225w poly panels, 57 cents a watt pallets!
- Top Solar 180w mono panels, 76 panels left, 57 cents a watt.
- Qty. 50, Prostar AGM 12Volt 200AH maintenance-free deep-cycle batteries for off-grid power, $280 each or best offer takes all!
- Qty. 5000, LED 'Par 38' light bulbs, 12 watts each 650 lumens ("60 watt equivalent") soft white, UL listed, ...MAKE OFFER!
- 50 kw WIND TURBINES, grid-tie 60 hz 3-phase, factory list = $50k each....sell both for $69k or $35k each! NEW, Full warranty. Towers not included. Sitting in California.
Before you take the advice of someone peddling older model solar panels-compare the "output to cost" of a higher wattage panel or even a Large Format 72 cell panel with over 300w of power.
Since roof space is limited on many buildings it only makes sense to install the highest wattage of panel that you can afford giving you more bang for your buck with less hardware to buy.
Watch Out for those slick talking salesman that put profits before value.
Thank You for stopping by-Share and Comment below. If additional information in needed or you have a question let me know. Together we can make a difference. Build a Green StLouis Green Building Tips and Resources from Scotty-St Louis Renewable Energy Green Blog
11.15.2013
CAD Heavy Duty Solar Racking Designs by Scotty
DIY Build Your Own Solar Ballasted Racking System using these CAD Plans by Scotty-Scotts Contracting, StLouis Renewable Energy. In a recent Solar Project I had a few issues of finding a Heavy Duty Ballasted Racking Design for Skyscraper High Wind Zones.
This is a simple heavy duty plan that you can build yourself as its made out of standard metal sizes and adaptable to your specs.
Install Central Ballast Per Engineering Wind Force Guidelines. 85mph Minimum Design StLouis MO.
Heavy Duty Ballasted Racking Design for Skyscraper High Wind Zones
 |
| ISO View of Racking with CMU |
 |
| Underside View of Basic Racking Design |
 |
| Racking Design CAD Materials Designed by Scotty |
 |
| Side View Note: More Ballast Points Suggested per Engineering Report |
 |
| Note: Fillet Welds Suggested at all Connection Points |
Additional Plans are available or place your orders using the Contact Form on the right.Scotty
Thank you for stopping by St Louis Renewable Energy. Feel free to comment in the section below or contact Scotts Contracting- St Louis Home Improvement Projects and Energy Reducing Needs Get Your Green Building Tips and Resources at St Louis Renewable Energy Green Blog
4.20.2011
Just a Few of the Reasons I Choose to Offer Westinghouse Solar Panels
- Racking,
- Wiring,
- Grounding and
- Inverter are built into a larger-format 235-watt panel (AC Power), thereby
- delivering higher performance and
- lower installed cost.
 |
| St Louis Renewable Energy wants everyone to know how easy it is to Generate Your Own Electricity from the Sun. |
Westinghouse Solar, Inc. (Nasdaq:WEST), a designer and manufacturer of solar power systems, today announced the release of their second-generation AC solar panel. This new panel will be available in the second quarter at a very attractive price point.
In 2007, Westinghouse Solar pioneered the concept of integrating the racking, wiring and grounding directly into the solar panel. This revolutionary solar panel, originally carrying the "Andalay" name, quickly won industry acclaim.
- In 2009, the company again broke new ground with the first AC solar panel, reducing the number of parts for a rooftop solar installation by 80 percent and reducing labor by 50 percent.
- This first AC panel -- which won the 2009 Popular Mechanics Breakthrough Award -- has become the most widely installed AC solar panel. Continuing on their path of innovation,
- Westinghouse Solar's second generation AC solar panel is based on a large format design, and includes a number of differentiating features that contribute to the panel's reliability, performance and safety.
"Much like the Prius, innovations can take time to gain market acceptance before they become a standard among mainstream consumers," said Barry Cinnamon, CEO of Westinghouse Solar.
- "Market data for AC solar panels clearly show rapid homeowner and installer acceptance. The performance, reliability and safety benefits of our AC solar panels are particularly appealing to the legions of new solar installers, especially electricians, HVAC contractors and home improvement companies.
- As ordinary solar panels become a commodity, our focus on delivering a product that dramatically lowers installation costs --
- while backed by a brand that consumers know and trust -- sets us apart from the rest of the industry."
 |
| Scotts Contracting-St Louis Renewable Energy |
If you are interested in a Solar Electric System for your Home or Office. Scotts Contracting can supply your Solar Panels (from any number of sources) , Inverters, Wiring Diagrams, Photos, Instructions and Any Other Needed information so that You can Create your own Electricity and Get out From Under
Ameren UE's Dirty Coal and Nuclear Agenda.
DIY and Save!or Scotty can lend a hand.
-=-=-=-=-
Ameren UE's Dirty Coal and Nuclear Agenda.
DIY and Save!or Scotty can lend a hand.
-=-=-=-=-
10.21.2009
DIY Solar Panels
Scotty writes:
I found the following article via
the web at the sites supplied below.
I hope you find the information usefull!
Build your own Solar Panel
Because I think that the price of a solar panel is still pretty high(in Europe), and because the stimulation from our government (in the Netherlands) is not so good (very,very complicated and time consuming) I started the project of building my own solar panel. I would like to invite anyone who has some experience with this or is interested in it ,to give me any advice or remarks about it. The main challenge is to build a panel that can withstand heat, cold, rain and hail for many years.
The First Solar Cells
After some experimenting and very long brainstorming about how to continue, I found another seller on Ebay who had the same cells (of which he gave the specification that they were 1,75 Wp each……) But these were slightly damaged. Well I decided to buy 500 cells ,a mix of 3 different qualities. The seller had not counted these cells but there were 620 cells, of which after a first selection , just over 500 were reasonably good. Not a bad deal to start with. And a lot cheaper! Also now I had over 100 cells for practice on soldering and handling.
Given the fact that the glass takes away about 10% of the power,without the glass it would have been about 17 Watt. I expect that during summer as the sun rises much higher above the horizon, the measurement will give higher readings , thus coming closer to the specifications…. I am using normal 4 mm (0.16 inch) glass because it costs me nothing. If you just look around near places were they renovate old houses you can get the old glass for free…… This compared to the real stuff they use for solarpanels which is quite expensive and probably very difficult to find.
The kit will have to dry for a few days, but anyhow the weather forecast does not indicate any sunshine the coming days………
Well, who feels like building panels also ? Or give me some advice, or share experience. I do not mind getting negative critics because they might be correct………and they are there to be solved !
Scotty writes:
I found the following article via
the web at the sites supplied below.
I hope you find the information useful!
I found the following article via
the web at the sites supplied below.
I hope you find the information usefull!
Build your own Solar Panel
 |
| how to build solar panels from scratch |
Because I think that the price of a solar panel is still pretty high(in Europe), and because the stimulation from our government (in the Netherlands) is not so good (very,very complicated and time consuming) I started the project of building my own solar panel. I would like to invite anyone who has some experience with this or is interested in it ,to give me any advice or remarks about it. The main challenge is to build a panel that can withstand heat, cold, rain and hail for many years.
Buying My First Solar Cells
In October 2008 I bought my first 100 cells via Ebay. But as I later learned, they were still very expensive: 300 Euros for 100 cells, including shipping. I was told they should produce 1,98 Watt each. Below a picture :The First Solar Cells
After some experimenting and very long brainstorming about how to continue, I found another seller on Ebay who had the same cells (of which he gave the specification that they were 1,75 Wp each……) But these were slightly damaged. Well I decided to buy 500 cells ,a mix of 3 different qualities. The seller had not counted these cells but there were 620 cells, of which after a first selection , just over 500 were reasonably good. Not a bad deal to start with. And a lot cheaper! Also now I had over 100 cells for practice on soldering and handling.
 |
| The 620 Cells! |
Building the First Small Panel.
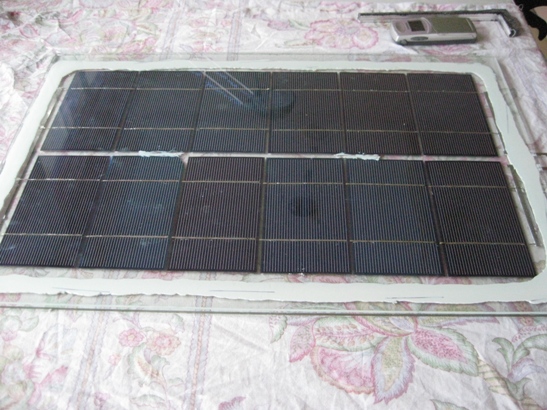
Well I got started. Beginning with the soldering-technique, that takes some practice, but after a while you get the hang of it. And now my first small experimental panel is ready! The main focus and moreover challenge is to get the cells 100% sealed: air and water tight. The cheapest solution for me is to make a double-glass construction. And the cells in between the 2 plates of glass. The panel is made of 12 cells, each 0.55 Volts. On the picture below you can see many purple coloured wires. Those wires are each connected in between each cell so afterwards I can still do some measurements to compare each separate cell. |
| My First Do-it-yourself Solar Panel! |
The First Measurements in the Sun
I must say that at first I was worried whether I would see the cells really produce the power they should. But after building a variable resistance (making it possible for me to roughly find the maximum power point) the sun at last was shining (not much sunshine here beginning of February) and I got my first real measurement : 15,5 Watt. According to the specifications the panel should give a maximum of 12 x 1,75 W = 21 Wp.Given the fact that the glass takes away about 10% of the power,without the glass it would have been about 17 Watt. I expect that during summer as the sun rises much higher above the horizon, the measurement will give higher readings , thus coming closer to the specifications…. I am using normal 4 mm (0.16 inch) glass because it costs me nothing. If you just look around near places were they renovate old houses you can get the old glass for free…… This compared to the real stuff they use for solarpanels which is quite expensive and probably very difficult to find.
Influence of Heating the Panel in the Sun.
During the first measurements, I found that the heating up of the panel was pretty strong. But this especially was the case for the backside. were the cells are glued upon (using the same kit I used for glueing and sealing the panel). This panel is 12 mm (0.47 inch) thick : 2 plates of glass each 4 mm (0.16 inch) and 4 mm in between. What troubles me is the temperature-difference between the front and backplate of glass. This will result in different expansions creating stress on the sealing,if that is repeated too often it will start leaking. Now I am using the same kit as is being used in solar panel factories. But it still worries me. A solution can be to keep the panels small, so the difference in expansion stays minimal.Improvements
A solution to the temperature-problem can also be to make the gap between the 2 plates of glass smaller. So the heat will be more evenly dissipated to both the front and backside ( thereby also creating more cooling capacity). My next panel (picture below) is the same size,the difference is the distance between the 2 plates of glass : it is now 1.5 mm (0.059 inch) …..and this also makes the sealing a lot easier and thereby better. I have used pieces of copper winding wire that I happened to have : 1.2 mm (0.047 inch) thick. I took several pieces of about 3 cm and spread them evenly along the side on the glass backplate. Then the kit along them all around the full edge. And finally pressed the front plate on it. The result is a gap between the plates somewhere between 1.2 mm and 1.5 mm. So on the inside, there is some trapped air (with, of course, a certain amount of humidity in it), which can potentially cause condensation. But my hope is that the amount of that is so small (only very small amount of air……) that it will not be a factor…… ( In the first panel I did put some stuff that can “eat” the condensation. I got this out of old double glass that I separated,the stuff is inside the aluminum strips between the double glass edges) |
| The Improved Panel |
The kit will have to dry for a few days, but anyhow the weather forecast does not indicate any sunshine the coming days………
First Results
Bottom line is that if the output of each cell really hits 1,75 Wp then I can come to a price of Euro 1,20 per Wp (or even lower than that….) And with such a price the panel will not have to last for 20 years……..but off course that is my aim ! That will be the main challenge ! But I must say with this second panel my hopes are getting higher.Well, who feels like building panels also ? Or give me some advice, or share experience. I do not mind getting negative critics because they might be correct………and they are there to be solved !
- Do you like this article? Share it with others:
Scotty writes:
I found the following article via
the web at the sites supplied below.
I hope you find the information useful!
- “Build your own Solar Panels.
This website has been created to present the information I have learned from building my own solar panels. Using common household materials and tools, I was able to build quality panels as durable and efficient as commercially bought panels. Altogether the panels cost less than cheap panels of comparable wattage and I fully expect a long life from them....
...If you are mechanically inclined enough to cut plexiglass and wood to size, I am sure you will find this process much easier. If you are the type that worries about cutting everything correctly, this panel is much more forgiving, and you still end up with a high quality panel...”
First I started making a string with 12 cells connected in series.
You can see the jig I made for spacing the cells while soldering. It is a supermarket savings card, cut in pieces and super glued to Masonite.
You can see the jig I made for spacing the cells while soldering. It is a supermarket savings card, cut in pieces and super glued to Masonite.
Once I completed the 3 strings. I laid them out on a piece of glass.
I laid them out so they could be connected together in series.
I put small dots of epoxy in spots to keep everything from moving around. I didn't put any epoxy near the ends because I had to solder on the bus bars. I slid a piece of paper underneath the cells while I soldered on the bus bars, so no flux would get on the clean glass.
I put the paper over the cells, and two small dots of epoxy in two corners on one side of the panel.
If you epoxy all four corners, the paper will wrinkle under vacuum.
If you epoxy all four corners, the paper will wrinkle under vacuum.
By putting the epoxy on one end it will let the paper flatten out to the side where there is no epoxy.
The epoxy keeps the paper from moving while you put the laminate over it.
The epoxy keeps the paper from moving while you put the laminate over it.
I then lay the glass, cells and paper on top of a piece of laminate. Adhesive side up. I try and center it within the laminate as best I can.
Next comes the laminate over the top. Adhesive side down.Make sure and lay it down as square as possible. Even with the epoxy the paper will move if you move the laminate over the top of it.
I hold the layers square with each other and start ironing together the laminate around the edges.
Its made the two sheets into a bag with a small opening at the bottom.
How I put the vacuum tube into the small opening. Its a hollowed out ball point pen. Seal it as best as possible.
I turn on the vacuum, and once all air is removed and the assembly is tight against the glass, I use a heat-gun and seal the laminate around the small opening for the vacuum.
I then heated the laminate to the paper side of the panel. I left the glass side alone, and once cooled down, cut the laminate off the front and sides.
To hook up the wires, I cut small slits through the laminate over the positive and negative bus bars. Only big enough to solder a wire, and directly in the middle of the bus bar. Be careful not to break the vacuum.
Once the wire is soldered on, I quickly cover the connection with JB Weld.
The laminate is actually adhered to the front on this one. I took it off later. It takes a long time for the glass to absorb enough heat to melt the laminate.
17.8 Volts DC, and a nice flat waveform.
Articles supplied by: http://www.olino.org/us/articles/2009/03/19/building-my-own-solar-panel
Subscribe to:
Posts (Atom)
Featured Post
How Two Friends Turned Abandoned CASTLE into a 4☆HOTEL | by @chateaudut...
Join us on an extraordinary journey as two lifelong friends, Francis and Benoit, turn a crumbling, centuries-old castle into a stunning 4-st...

-
Thank You for stopping by the Green Blog. If additional information in needed or you have a question let me know by posting a question or ...
-
Coalition for the Environment flat out opposes second nuclear plant | More ...
-
Convection is the movement of air in response to heat Warm air rises, cool air sinks. Because walls and windows are usually cooler than th...

